How to manage stock in WooCommerce – WooCommerce inventory management
If you”re going to seel physical products in your WooCommerce store you probably want to make sure that you don’t sell more products than you actually have in stock. Luckily WooCommerce lets you easily manage stock – you just need to know how to properly control stock of your products.
Today I’ll show you how to manage stock of your simple and variable products in WooCommerce so you’ll never have issues selling things that are not in stock at the moment: You won’t need any additional plugins for that – WooCommerce has all the tools needed for inventory management. Here’s what you need to check:
Let’s begin with general inventory settings.
WooCommerce inventory settings
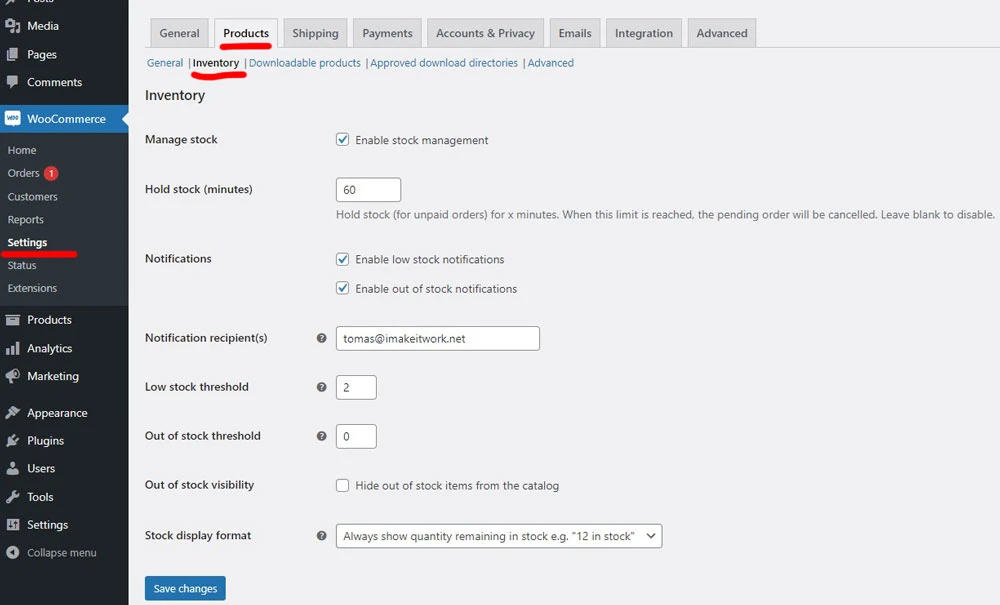
General WooCommerce stock control settings can be found in WooCommerce >> Settings >> Products >> Inventory page.

Here’s what you can control:
Enable stock management. This setting is enabled by default in WooCommerce.
Hold Stock (minutes). If customer starts checkout procedure but does not finish it in time, stock value gets back to previous stock number.
Notifications. Notify stock owner about low stock items, or out of stock items by email.
Low stock threshold. Once product stock number reaches this threashold store owner will be notified by email.
Out of stock threshold. Once product stock reaches this number product may show up as out of stock for customers, and store owner could be notified about the stock numbers by email.
Out of stock visibility. Should out of stock products show up in catalog for customers or not.
Stock display format. You may choose if stock number has to be shown in the product page for customers. You may select between always showing stock numbers, only showing stock if it’s low (like only 2 left in stock), or not showing stock information at all for store visitors.
How to manage simple product stock in WooCommerce
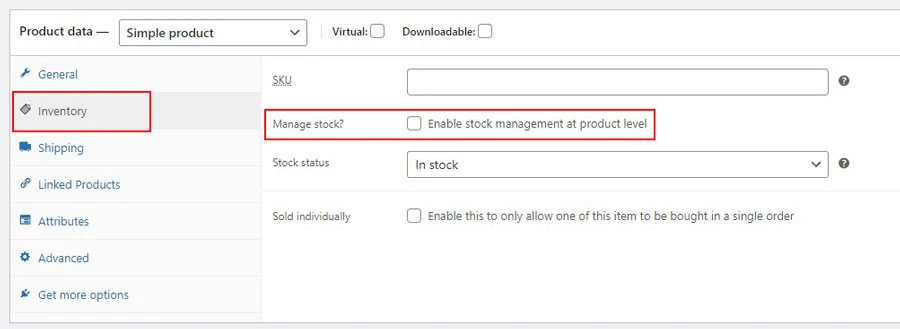
Simple products are probably the most popular product type in WooCommerce. To control their stock you need to open product page, and click on Inventory tab in the Product Data window.
By default WooCommerce products don’t have stock management enabled. Check Enable stock management at product level to begin.

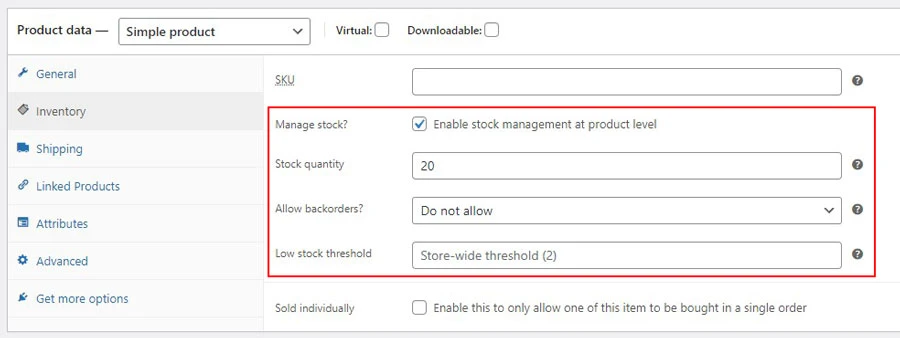
Once stock management is enabled you’ll have three new fields:
Stock quantity. That’s basically how much items you have in stock.
Allow backorders. Here you may allow stock quantity become negative number. Customers will be able to purchase product if you don’t have it in stock. Here are the options:
Do not allow backorders – customers won’t be able to purchase products that are out of stock.
Allow, but notify customer – this will allow to purchase but will notify customer about possible delays or other issues since the product in not in stock at the moment.
Allow – just let customers buy the product even if it’s out of stock, without any notifications.Low stock threshold. Here you can override the default low stock threshold only for specific product – get notified about low stock earlier or later compared to other products in your store.

Once stock quantity is added don’t forget to save changes.
How to manage stock for variable products in WooCommerce
If you have WooCommerce product with options (in other words – variable product), you can control stock of any product variation individually.
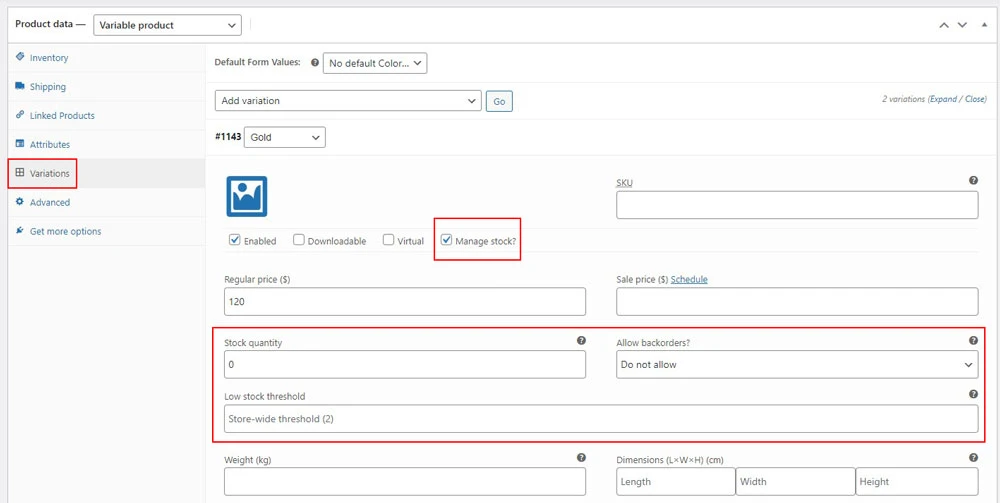
To control stock of a variable product you need to click Varations and open the actual variation you want to change stock settings of:

Here’s what you need to do:
Check Manage stock to enable stock management of variable product
Enter stock quantity
Change Allow backorders value if needed. You have the same options as a simple product.
Do not allow backorders – customers won’t be able to purchase products that are out of stock.
Allow, but notify customer – this will allow to purchase but will notify customer about possible delays or other issues since the product in not in stock at the moment.
Allow – just let customers buy the product even if it’s out of stock, without any notifications.Change Low stock threshold if needed, to get notifications if product reaches specific Stock quantity number.
You can change these settings for any of the product variations individually.
Need quick WordPress help?
Get your website fixed, optimized, or migrated — fast, secure, and handled personally by a developer with 15+ years of experience.